Home > Using PM plug-in > Setting up filters > Adding an Excel file filter > Simple Wizard
To run the Simple wizard:
Follow steps 1 to 6 from Adding an Excel file filter.
Select Simple Wizard and click
Next.
The Preview page appears.
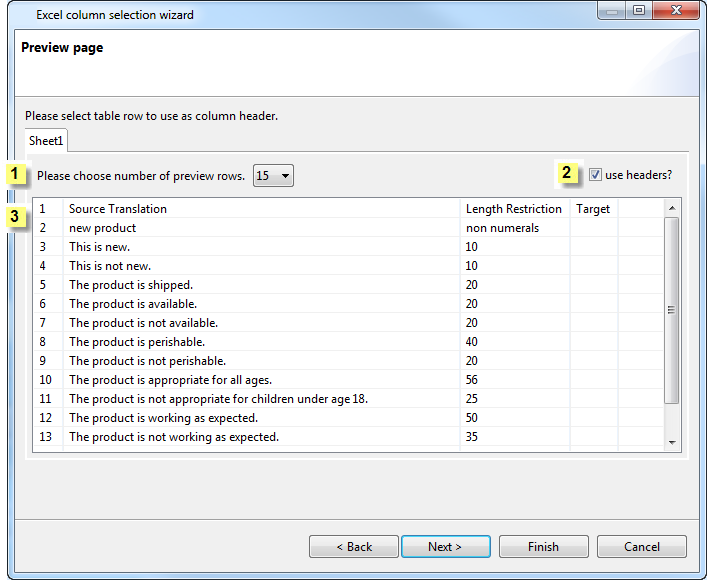
The content in the Preview page is selected for translation. The Preview
page models an Excel file.
Number |
Use |
to |
Please choose number of preview rows drop down list |
select the number of rows to show on the preview page. |
|
Use headers check box |
use the column headers of the Excel sheet. If not selected, the column letter (A,B, C) appears in the next step. |
|
Table with the Excel sheet contents |
select the first row for translation. Rows above the selected row will not be translated. |
Click Finish.
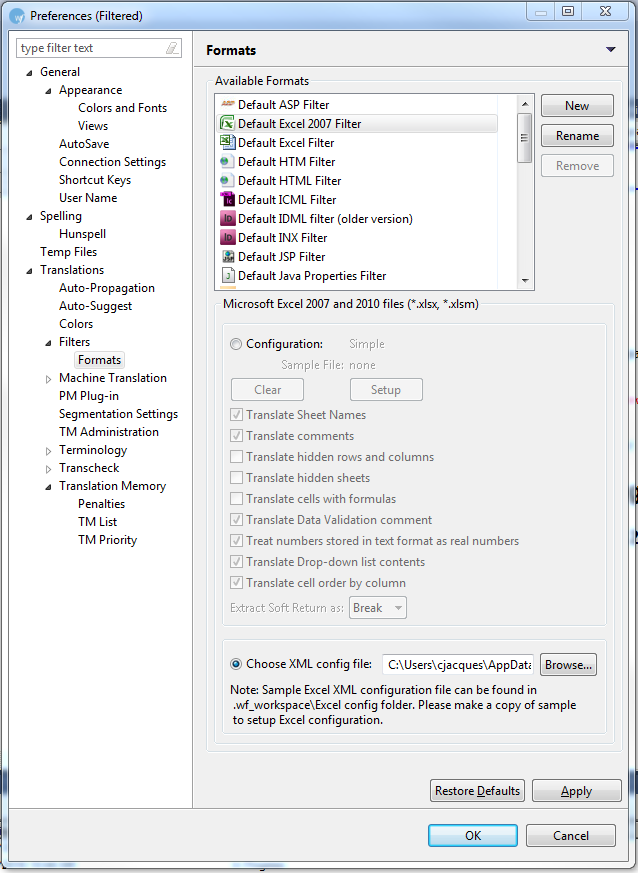
The configuration and sample file path appears in the Formats option
box as shown below.
Select the Translate Sheet Names checkbox to include sheet names as translatable text. Selected by default.
Select Translate Comments to clear it, and not include comments as translatable text. Selected by default.
Select the Translate hidden rows and columns checkbox to include rows and columns hidden in the Excel file as translatable text.
Select Translate hidden sheets to include hidden Excel sheets.
Select the Translate cell with formulas checkbox to include cells with notes and formulas as translatable text.
Select Translate Data Validation comment to clear it, and not include columns in the Excel sheet used to record comments validating the data, for example, columns recording vaccination data by date applied and dosage. Selected by default.
Select the Treat numbers stored in text format as real numbers checkbox to include numbers as translatable text. Selected by default.
Select Translate Drop-down list contents to include the drop-down list contents in the translation. Selected by default.
Select Translate cell order by column to extract cells by columns, instead of by rows. Selected by default.
Select the preferred option for Extract Soft Return as: Break or Tag.
Select Choose
XML config file to format the filter using an XML file.
Note: Selecting this option
disables the options immediately before. The XML file overrides the
Excel Column Selection Wizard, if it has already been set up.
Click Browse to browse to the excelConfig file. The default file is a sample to be edited for your configuration. To edit the file:
Copy the sample excelConfig file to your preferred folder.
Open the copy of the sample excelConfig file in your preferred text or XML editor.
Edit the copied sample
excelConfig file to set up the filter configuration. The file
acts as a template for your preferred filter setup.
Note: Remove or comment
out any fields in XML that you are not using.
Save the file.
Select the path to the
edited excelConfig file. An example is shown below.
Click Apply.
Click OK.
An Excel file filter is set up.
Note: You can now directly
open Excel files using this filter. While opening files you must
choose the correct filter, when prompted. You can also rename
the filter using the Rename button.