Quick Tools Bilingual Export

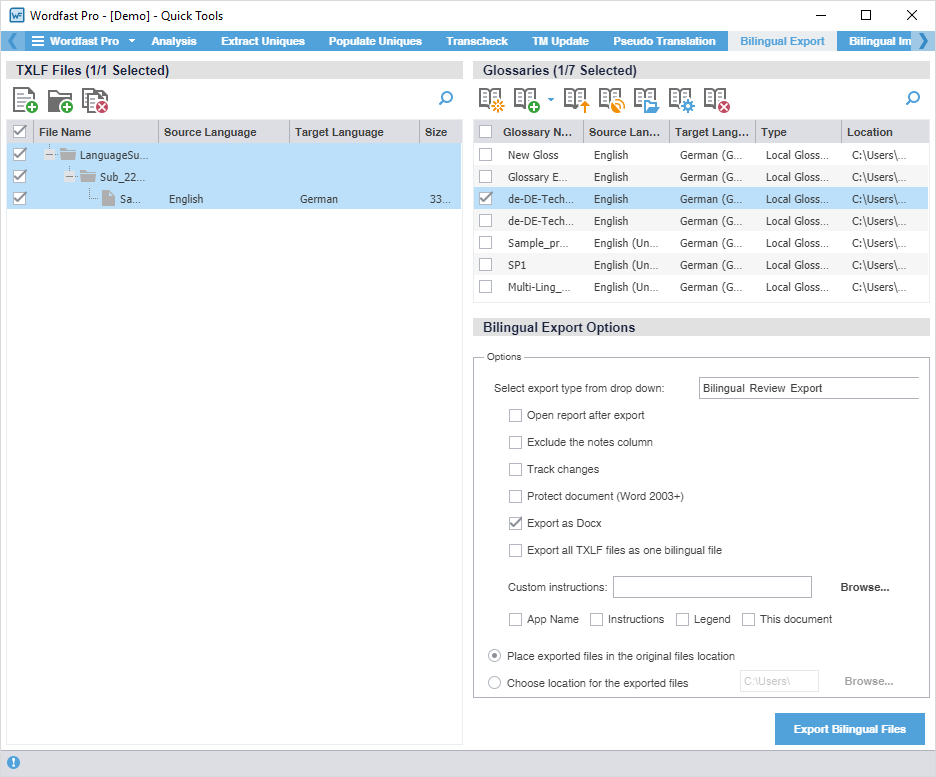
Use Bilingual Export to export the TXLF file with highlighted glossary terms to a .DOC or .DOCX format for edit and translation of the content using Microsoft Word (Word).

  Alert:

You must not edit the exported table format. This includes merging or expanding segments and adding text outside of the target or notes column. Editing the exported table format will result in errors during bilingual import.

To conduct a Quick Tools bilingual export:

  1. Click the Wordfast Pro drop-down menu and select Quick Tools.
  2. Click the Bilingual Export tab, if not already selected.
  3. On the TXLF Files panel, choose one of the following actions:
      Note:

    To search the File Name column for a particular string, enter the search string in the available search field next toon the TXLF Files panel.

    Add Files

    Click to browse and select a file from a folder.

    Add Folder

    Click to browse and select a folder and all its files.

    Remove Files

    Click to remove a folder and all its files, or all selected files from the list.

  4.   Note:

    To search the File Name column for a particular string, enter the search string in the available search field next toon the Glossaries panel.

    On the Glossaries panel, choose one of the following actions:

    Item

    Action

    Create Local

    Create a glossary on your local computer.

    Add Local or Add Project Glossaries

    Select and choose from the drop-down list to add to a local glossary or to a project glossary.

    Note:   

    If you choose a project glossary, you can only add a glossary to a locale already assigned to the project.

    Import Glossary

    Select to import .TBX or tab-delimited files to a glossary assigned to the project.

    Connect to Remote

    Select to connect a remote glossary to the project.

    Open

    Select to open a glossary in the Glossary Editor view.

    Modify

    Select to modify a glossary assigned to the project.

    Remove

    Select to remove a glossary assigned to the project.

  5. On the Bilingual Export Options panel, choose your export options.

    Option

    Action

    Select export type from drop-down

    Select an export type option from the drop-down list:

    • Bilingual Review Export — Creates a bilingual Word document.

    • WFC Bilingual Export (Export only) — Creates a Wordfast Classic compatible document solely for export.

    • MS-Word Table — Creates a Word document with the source and target in a two-column table.

    • Bilingual Review Export - WFC (allows import) — Creates a bilingual Word document for import by Wordfast Classic users.

    Open report after export

    Select to automatically display the Export Report after action completion.

    Exclude the notes column

    Select to remove the Notes column from the exported Word document. Instead, the export includes the notes from the TXLF file as Comments in the Word document.

    Track changes

    Select to track changes in the exported Word document.

    Protect document (Word 2003+)

    Select to only allow content edits in the available table space.

    Note:   

    This helps avoid any import errors.

    Export as Docx

    Select to export bilingual file to a .DOCX Word file format.

    Export all TXLF files as one bilingual file

    Select to export all converted TXLF files into a single bilingual Word document.

  6. (Optional) Either browse to and select a Custom instructions text file, or choose any of the following options to include in the file, using default instructions:
    • App Name

    • Instructions

    • Legend

    • This document

  7. Choose to either use the original file location, or browse and select an alternate location.
  8. Click Export Bilingual Files.
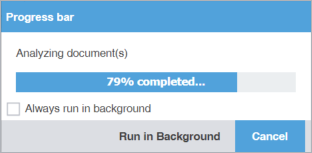
  9. (Optional) On the Progress bar dialog, you can select Always run in background to preserve the background batch action for future analysis actions, then click Run in Background.
  10. If you chose to run Export Bilingual Files in the background, you can monitor its progress.
      Note:

    If you choose to run more than one batch action in the background, each action will have its own progress bar.

    Each exported document is saved to the specified folder on your local computer. The example does not include any custom content.


  11. (Optional) View the bilingual files at the location you specified on your computer.