Using Wordfast Pro and Classic Glossaries

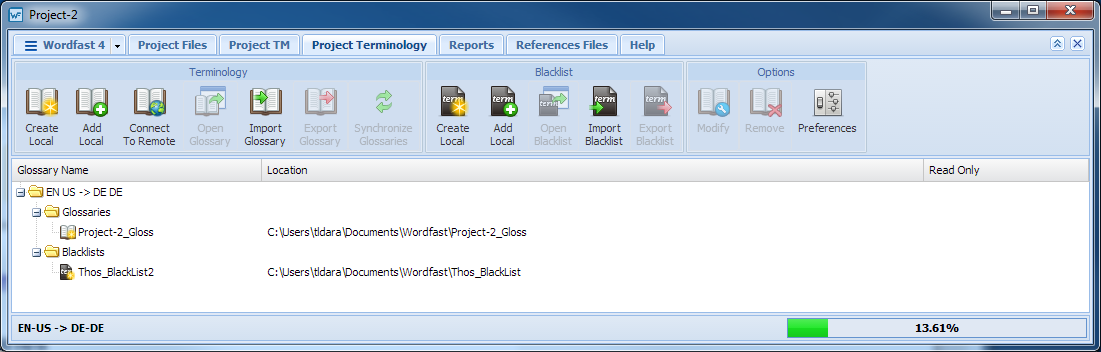
Wordfast Professional (WF Pro), Wordfast 3, and Wordfast Classic (WFC) can share project glossaries. The WF Pro glossary .txt file is located with your glossary files. WFC must connect to this text glossary file. Once the WF Pro glossary is created, WF Pro must be closed to permit WFC to connect to the WF Pro glossary.

The example below shows how a glossary is shared between Wordfast Pro, Wordfast 3, and Wordfast Classic.

  1. Open a project in Wordfast Pro.
  2. Click Project Terminology.

    The glossaries for the project appear.

    Figure 1. Project Terminology

  3. Locate the glossary to be shared as follows:
    1. Note the location of the glossary to be shared.
    2. Browse to the glossary folder.
    3. Open the glossary folder.
    4. In the folder, locate the <glossary_name>.txt file. This is the glossary to be added to Wordfast Classic.
  4. Close Wordfast Pro.
      Note:

    Failure to close Wordfast Pro leaves the glossary file locked and it cannot be opened or modified.

  5. Activate Wordfast Classic in the Word document using one of the following methods.
    • Click the Wordfast Classic button.

    • Press Ctrl+Alt+W.

  6. Add the <glossary_name>.txt file located in Wordfast Pro above.
  7. Select the glossary, and click Reorganize.
      Note:

    Failure to reorganize the glossary prevents additions to the glossary.

  8. Select the terms to be added, and press Ctrl+Alt+T to add terms to the glossary in Wordfast Classic.

    The Edit Entry dialog box appears.

  9. Enter the source term, or the target term, and an optional comment.

    An example is shown below.

  10. Click OK.
  11. Finish working in Wordfast Classic, and close the Word document.
  12. Open Project Terminology in Wordfast Pro.
  13. Open the glossary.

    The added term appears in the glossary, as shown in the example below.